


This page will hopefully guide you through getting your 1st Garforth email accounts setup and ready to use on your devices.
We strongly recommend that you use the Microsoft Outlook apps to access your 1st Garforth email accounts. Not only are the Outlook apps specifically designed to work with Office 365, they also mean that when there is a problem, and you ring Kev, it will be easier for him to talk you through what to do 😁.
If you struggle with anything below or something is missing, check out Microsoft’s own instructions as they will probably be more up to date: Add an email account to Outlook – Microsoft Support
If you prefer to watch a video guide, Microsoft’s guides for PC & Mac can be found on this YouTube playlist: Getting Started with Microsoft Outlook
And video guides for mobile devices (phones & tablets) can be found on this YouTube playlist: Microsoft Outlook for Mobile
Mobile Device Setup
Step 1: Getting the App
If you already have Outlook on your PC, phone or tablet, great skip this step. If not please follow the link below to get the correct Outlook app for your mobile device, unfortunately we don’t have licences available to offer you the desktop app if you don’t already have it.
The rest of these instructions will mostly focus on the mobile setup, if you want to add your email account to your PC or mac, please follow the instructions here: Add an email account to Outlook – Microsoft Support
Step 2: Adding your Account
2a: If you already have and use the Outlook App
If you already have outlook installed and configured with other email accounts, you can still add your 1st Garforth account(s).
In the menu, under your existing accounts you should see either a (+) symbol or an ‘Add Account’ Link. Click this then follow step 2b below, but selecting shared mailbox if the option is presented.
2b: If this is the first time you’ve setup Outlook on your device
The first time you open the Outlook app you will be greeted with a screen similar to this:
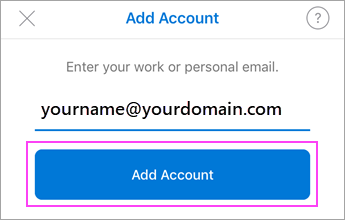
Enter your email address (the one with your name in, not the section email) and click ‘Add Account’
It should detect all the settings for you and simply ask you to enter your passsword.
If there’s any multifactor authentication to do, you will be asked for that next…
Done!
Step 3: (Optional) Adding your Section’s Shared Mailbox.
Unless you’ve asked for it to be setup differently, the section mailbox (eg Apache@1st…) will be setup as a shared mailbox. This means that multiple leaders can access the account, without duplicating emails, or fighting over passwords.
To add your section’s account as a second mailbox straight away, click ‘continue’ on the ‘add another account’ screen. If you are coming back to the app to do this start at step 2a.
Repeat step 2b above, but you shouldn’t be prompted for a password. If you have access to the mailbox, it will be added as a second account in your app. If you don’t have access and you think you should, check with your Section Leader or Kev (if you are the section leader).
Step 4: Start emailing…
Hopefully you can figure this bit out, but if not, check out the video guides at the top of the page.
Accessing your email Online
Of course, you don’t have to do any of that, you can access your email in the browser using Outlook online.
You can access it via the Sign In menu above, and then clicking ‘Outlook’ or you can go direct by visiting: https://outlook.office.com/mail/
If you want to access a shared mailbox online you’ll need to click on your name up in the top right, and select ‘Open another mailbox’.
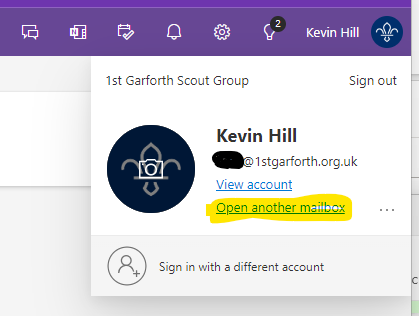
Type in the name of the shared mailbox, and if you have access it will appear. Job done.
